The following is what happens when you take a person who appreciates mid-century atomic age styling and decor, add an aging iPad1, and a desire to create something interesting and unique. Presenting...
...a Vintage TV Remix.

The internals have been gutted out and replaced with a 32GB iPad 1. The iPad is fully functional but is currently playing a looped video playlist consisting of vintage TV shows and commercials.
STEP 1. FIND A VINTAGE TV. The first step of the project was to locate a vintage TV. I was initially looking for a typical rectangular shell with plastic woodgrain pattern. Eva and I scoured every thrift store and antique shop in a 20 mile radius and even went hunting through the antique shops in Scottsdale. Plenty of vintage radios, calculators, phones, and typewriters, but not a single vintage (pre-1980's) TV. Not one.
 I had to resort to my go-to place to find anything and everything from my childhood... eBay. There were plenty of TVs there. Many were the correct size. But some of the prices were far too great for what I was going to use it for. I tried desperately to find one that was non-functional. I stumbled across one that was the right size, generally in the right price-range, and whose functioning status was in question. Here's what I picked up.
This TV started life out as a 1975 Philco B&W portable TV model B370FBL. It featured a 9" diagonal picture, and all of the manual controls that were standard for TV sets in the 70's. It had a curvy egg-shaped shell that seemed more suitable for the 1960's or maybe late 50's. It had very Jetson's-like qualities.
 STEP 2. EXPOSE THE GUTS. Once the TV arrived, the next step was to remove the inner circuitry and contents. Careful examination of the shell revealed the screws that held the shell to the chassis. With the screws removed the entire chassis and front faceplate/bezel were easily separated from the shell. I didn't have a detailed plan at the beginning of this project. Without a plan, I was uncertain as to which parts of the TV I'd need to preserve and which would be discarded. So I examined the construction of the chassis and components to determine the best way to dismantle the pieces with minimal destruction to the individual components.
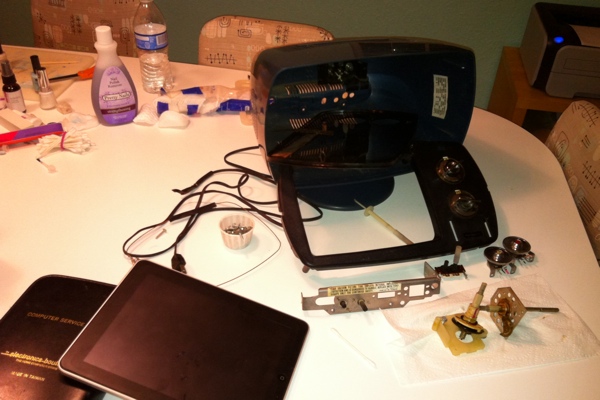 STEP 3. DISMANTLE. With great patience and care I disassembled the components. At this point in time, I knew enough of my non-existent plan to know that I wanted to preserve every dial, knob, and anything else that would be visible on the exterior. That included the power cord. The chassis was surprisingly modular and so I was able to isolate and preserve the back frame of the chassis as a support for the rear adjustment knobs. All pieces were gently cleaned to remove decades worth of grime and dust.
STEP 4. "STUFF" HAPPENS. Once the housing was separated from the rest of the chassis and components I was able to match the iPad up with the opening. It was a perfect fit... IF the iPad were to be centered in the opening. But because the housing was curved and the opening in the bezel was offset, it turned out that the iPad was too large to fit completely inside the TV housing. Had this been a more traditional rectangular case, the iPad would've fit completely and perfectly within. But this egg-type Jetsons TV offered less room. This meant that I'd have to cut an opening in the housing. Since the opening in the bezel for the screen was vertically centered that meant that a top or bottom cut would not allow the iPad to be centered in the bezel opening. The only option was a slot on the side.

So I installed the bezel into the opening of the housing and used a pencil to mark where the bezel ended. I ran a pencil line around the left half of the housing and used my dremel tool to carefully cut the first edge of the slot. I rechecked my measurement of the thickness of the iPad and then made a cut in the housing for the other edge... allowing enough additional space for the iPad to slide in without rubbing.
Once the slot was cut and edges sanded, I temporarily lined the slot with black electrical tape to give it a cleaner appearance and to avoid having any edges scratch the iPad. I will eventually use some kind of tubing to permanently finish it off.
There was a helpful side effect to this design hiccup. By having a slot to insert the iPad, the power button, volume rocker, and headphone jack are all exposed. That means that I can turn on the iPad, adjust the volume and even use headphones without having to open up the case to access the iPad. This is what the artist Bob Ross would call, "a happy accident".
STEP 5. MOMENT OF TRUTH. With the slot cut in the side of the housing and no real way of knowing beforehand if the cut was made correctly, I loosely assembled the bezel onto the housing and inserted the iPad in the slot. I sync'ed an image of a classic test pattern to the iPad just to see how things would look:
 My initial response was that it looked amazing. The iPad was perfectly centered in the bezel opening. Only the iPad's screen was visible. The iPad's bezel was hidden by the TV bezel. Perfect! Even having the corner of the iPad slightly exposed on the left edge looked like it was designed that way. I was concerned that the iPad's single speaker would not be loud enough, but the sound escaped through the integrated speaker grill on the left side of the TV. The volume was more than adequate.
At this point, I breathed a sign of relief and was then eager to get this thing finished.
STEP 6. FINISHING TOUCHES. From this point on, things moved quickly. I attached the rear adjustment knobs to the chassis rail and then using the original screws, attached the TV case to the rail... exposing the knobs exactly where they were supposed to be. I used florist wire (thin aluminum wire used by florists to create floral arrangements) to secure some of the free floating knobs to the chassis. I attached the terminal block for the telescopic antenna in its opening. I used E6000 glue to attach the power slider-switch to the bezel from inside.
 For the front knobs and dials, I had considered simply hot gluing them into place from inside the housing, but I really wanted them to have some freedom of movement... even if I couldn't preserve the "click" of the channel changers. For the VHF and UHF knobs, I wrapped a few turns of electrical tape in order for them to snugly fit into the opening of the bezel. This worked as expected. The thumb wheels for "Briteness" and "Volume" proved to be a bit trickier. They were mounted to a long thin bolt with nuts used as spacers and holders to get them aligned correctly. Florist wire was used to attach the bolt to a support on the bezel.
A 30-pin iPad cable was fed through an opening in the rear of the housing so that the iPad could be charged, run on electric, or synced.
STEP 7. PROGRAMMING. With the TV assembled and all of the knobs, dials, and cables attached, it was now time to produce some vintage programming. Since I already own DVDs of classic TV shows, movies, and commercials, I simply used the free tool "Handbrake" to rip the DVDs into media files that would be playable on the iPad.
Since I wanted this TV to work like a video digital picture frame, I needed an iOS player app that supported video playlists. After doing some research and experimenting with trial versions (where available) I decided on OPlayer HD. This app not only supports the creation of video playlists, but can loop the playlist and mix video, photos, and music in the same playlist.
The playlist that I created consists of a TV show episode, 3-5 vintage commercials, another TV show episode, 3-5 commercials, etc. To make the playlist feel authentic, I used video that was Academy ratio (4:3) and black & white. I have a few TV show episodes, like Batman and Star Trek that are in color, but I will re-encode them specifically for this application in B&W.
ADVICE FOR THOSE WHO WANT TO MAKE ONE
Having gone through this process once, I have just a few pointers that might help make the process easier. I spent roughly 5 hours total on the assembling of the TV and another hour or so on researching the software to use. I will probably spend another 2-3 hours in selecting and ripping TV episodes and commercials.
The most important advice that I can offer is to have accurate and detailed measurements of the iPad and to be able to physically touch, handle, and measure the TV you will use before you buy it.
Additional advice is merely common sense that any DIYer already possesses... take your time, don't rush. If in the process of dismantling you are unsure of how things are assembled... wait, study, look for a service manual if possible. Keep in mind that vintage electronics can become brittle with age.
This project could also be scaled down to use a 7" Android tablet. There are vintage portable TV sets that contained a 5" picture tube that could enclose a 7" tablet. Most Android tablets are 16:9 but displaying a 4:3 image in "pillar box" would result in roughly a 5" image.
FINAL THOUGHT. I'm thoroughly delighted with the final results. By carefully creating a playlist of classic TV shows and commercials, the effect is complete. Watching "Avengers" with Patrick Macnee and Diana Rigg on this hi-tech vintage TV teleported me back 40+ years. It was a trip... but I'll have to return soon. :-)